
Now a worldwide phenomenon, the Japanese art of bonsai can provide hours of enjoyment and relaxation. If like many artists you wish to be in charge of your creation from the early stages it is possible to grow your own bonsai tree from a seed. There are also other options in the early stages such as growing from a seedling, sapling or even cloning your favorite tree.
Growing a Bonsai From a Seed
Known as Misho in Japanese, growing a bonsai from a seed is an extremely rewarding venture. It is, however, one that takes great patience. Choosing to grow your bonsai tree from seed can be a positive experience for a number of reasons. First and foremost, you have absolute control from the very beginning stages, you can train your bonsai as it grows, and thus there is no need to re-train. It is also cost-effective and with a little research can be relatively easy. Fully your own creation, the satisfaction when it finally grows is unsurpassed.
The drawback is that you will have to wait around three years before being able to shape or style your bonsai tree. If you’re a beginner keen to get started in the art of bonsai, you might want to plant a bonsai from a seed but simultaneously buy an established bonsai that you can begin to work and learn on immediately.
What Species Of Seeds Should You Start With for Your First Bonsai Tree?
There are hundreds of species of trees that make beautiful bonsai including Elms, Maples, Junipers, cedars, and Pines. You should pick the species of bonsai tree you would like to grow in accordance with your environment and experience. If you are looking to grow an indoor bonsai you will want to look at tropical/subtropical species. If you are growing your bonsai outdoors research which trees are indigenous to your area. Choosing seeds that are indigenous is a wise choice.
If you are a beginner, you will want to opt for a species which is more forgiving to beginner mistakes.
Where To Get Your Seeds
If you have decided that Misho is for you then you will need to start by obtaining seeds. Bonsai is the ancient Japanese art of training and pruning a tree which is contained by planting it in a container and therefore, there is no such thing as a special seed for a bonsai tree. You simply need seeds from a normal tree to begin the process. There are two ways to obtain seeds. The first is to collect them locally, this is the easiest route for beginners. The best time to collect seeds is late summer or early autumn.
Collecting Seeds for Bonsai
If you want to grow a coniferous bonsai, collect the cones from the tree, making sure they are brown and closed, green cones have not matured and open cones will most likely have lost their seeds already. Take the pine cones home, spread them out on a tray, and keep them in a dry, warm place. The pine cones should dry out and open, allowing the seeds to be released. If you have any difficulty in removing the seeds you can use tweezers to gently tease them out.
Buying Seeds for Bonsai
The alternative to collecting your own seeds would be to purchase them from a garden center or order them online. Research which type of seeds you wish to purchase and buy from a reputable seller. There are also bonsai growing kits that you can purchase to get you started.
This one is superb for beginners and comes with everything you need:

How to Plant Seeds for a Bonsai Tree
If you have collected your seeds locally, it should be fine to go ahead and plant them in late autumn, allowing them to follow their natural cycle. They should be in tune with the climate and present little problem germinating.
If you have purchased seeds that are unaccustomed to the climate or you wish to plant out with planting season, the seeds will require pre-treatment You will need to complete the process of scarification and/or stratification before you begin planting. Check the instructions on the packaging of your seeds.
To avoid stratification, the preferred option for a beginner would be to collect seeds locally.
Scarification
Scarification is the process of weakening the hard shell of a seed to speed up germination. Some seeds will benefit from scarification before stratification. Scarification can be done to seeds before stratification and also to seeds that have hard, tough shells and are stubborn and difficult to germinate such as the Redbud (Cercis canadensis) and the eucalyptus.
There is more than one method of scarification
Method 1 – Using sandpaper or a nail file rub the seed all over until it is noticeably dulled.
Method 2 – Using nail clippers or a knife put a definite but small nick in the seed.
Method 3 – Place the seeds in a small container of hot but not boiling water, a temperature of around 80 degrees is perfect. Leave them in the water as it cools, soaking for 12 to 24 hours. This helps to soften the seeds coat considerably. Seeds that float to the top should be discarded.
Stratification
Stratification is the simulation of the natural conditions that seeds require before they will germinate. Many species of tree have a winter dormancy phase; the seed will not be ready to grow until this dormancy is broken.
Cold Stratification Steps
- Step 1: Soak your seeds in water.
- Step 2: Fill a plastic bag (a zip lock food bag is perfect) with moist potting soil, many bonsai enthusiasts recommend peat moss or sand. It is important to note here that the substrate should be moist but not soaked.
- Step 3: Place the tree seeds in the bag and seal.
- Step 4: Place in the fridge at a temperature below 10 degrees.
It is important to keep a check on your seeds, watching carefully for any signs of fungus. A fungicide can be mixed into the bag with the seeds and soil if required. The period of stratification required can differ greatly between species. They will usually need somewhere between 21 and 90 days. When the seeds sprout they are ready to be removed from the fridge and planted.
Planting Your Bonsai Seeds
Now that your bonsai seeds are ready, lets go through the planting process step by step:
Step 1: Using a 5inch pot, spread a layer of your chosen substrate. This should be a coarse water draining substrate
Step 2: Add your chosen bonsai soil. Choosing the correct soil is important for a healthy bonsai. Check out our soil guide for more advice and information.
Step 3: Spread the seeds evenly across the soil, making sure to leave space between them.
Step 4: Cover the seeds with a top layer of soil and gently compact them with your fingers. For the top layer of soil 2 – 3cms will be ample.
Step 5: Water Thoroughly.
Around 6 weeks after your bonsai sprouts you can begin to use small amounts of fertilizer.
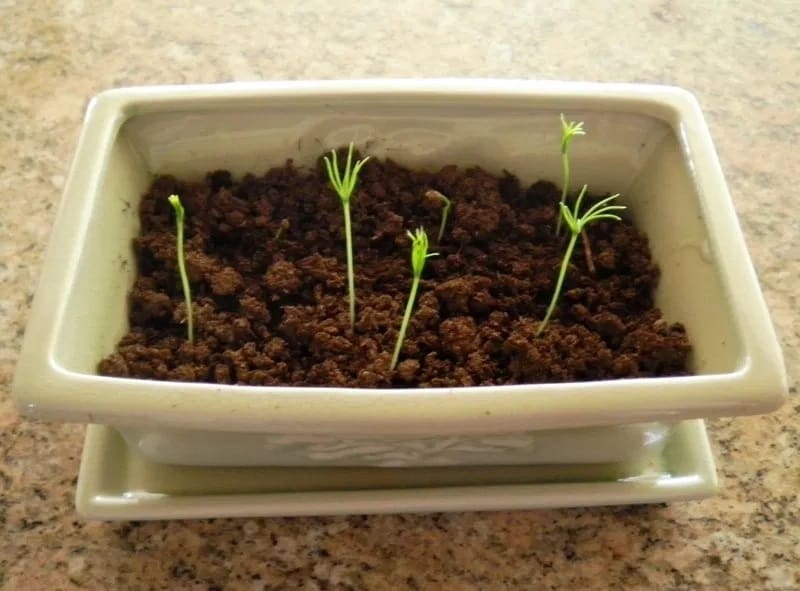
Bonsai Seedlings

When your bonsai has grown from a seed to a seedling you will need to transfer it into its own little individual pot, but you must take great care not to damage it. It’s is extremely delicate at this stage, whilst transferring ensure the roots do not dry out. Left to grow as a normal tree, the seedling develops a tap root, this is the root that will anchor down into the ground and spread through the soil to look for the essential nutrients. With bonsai this root should be removed preferably within the first year, the lateral roots should then be diverged out evenly to become the nebari (surface roots).
Planting/Transferring Your Seedling Step by Step
- Step 1: Gently remove your seedling from its current tray or pot. Try to push it out gently from underneath.
- Step 2: Spray the roots so they are clean and wet. Do not let them dry out during the process.
- Step 3: Identify the taproot.
- Step 4: Carefully remove the taproot with sharp scissors.
- Step 5: It is useful to spray a little root hormone on the remaining roots to encourage growth.
- Step 6: Using a chopstick or bamboo create a small hole in your chosen substrate.
- Step 7: With care and caution place the root mass into the hole.
- Step 8: When you are happy with the position use your finger to work the soil back into the gap until your seedling is secure.
Growing a Bonsai From a Sapling
A sapling is a young tree between the approximate ages of 1 to 3 years. Saplings are a great way to start off growing your bonsai tree. There is no need to pick a dwarf tree, to begin with, excellent bonsais can be made from a large variety of normal young trees. Pick a species that is suitable for bonsai. It must be able to withstand being in a container and having its roots and branches heavily pruned.
Aesthetically you should look for a sapling that is wider at the bottom and gets thinner as the trunk goes up. The lower branches should be shorter whilst the branches at the top should be longer. Desirable qualities for bonsai are smaller leaves or needles and attractive bark. Proportion is important in the creation of a bonsai so look for a sapling that is proportionate. Saplings are easy to train if you carefully prune and confine both the roots and tree canopies.
When picking your sapling look for a tree that is young and healthy. Gently release the tree from the ground or pot where it is currently growing. Clean the roots, rinsing gently until they hang downwards from the tree. If the tap root has not been removed do so following the same steps as above for a seedling. There are some species such as oak trees that after a year or two of growing in the ground will not do well having their tap root removed.
Pruning and Styling
Prune the tree in a way that is suggestive of the bonsai form you hope to create in the future. A sapling around 1 or 2 years old will have a trunk that can still be easily manipulated, you can change its form by placing the pot at unusual angles and changing the position annually or with gentle wiring.
The form of your bonsai is not determined solely by either training or species but by a combination of both as such, it is something to consider when choosing a sapling. Some species are more adept at certain forms and will prove easier to train.
Check our Bonsai Wiring Guide for more tips on how to train your bonsai tree!